Welcome back fellow Readers. The last post was fairly long as so much happened in 2014 that it was tough to get into a normal size post. In the end, there was still some detail left out to save some space. This will most likely be discussed in a different post in the future when I am all caught up and can narrow down on certain topics. 2015 was an interesting year in the sense that I was finally able to move into my house and get a bit comfortable. There was still plenty of work to do however as you will learn below.
I want to take this time really quick to thank everyone for the likes on facebook and the feedback I have gotten from people about how they have enjoyed it so far. I hope to keep everyone interested and I am hoping that these posts will lead to questions and answers that anyone may have. Feel free to post any of these questions, or even tips and comments, below the post and I will be happy to answer them.
Let’s Begin where we left off from 2014
2014 ended with some work right around Christmas and New Year’s. the taping and mudding had been finished and the first coat of primer was on the walls. The kitchen cabinets were starting to be installed as well with the boxes being put in place. The cabinet doors were left off as there was still painting that was needing to be done first. The custom shower was installed and everything was ready for the finishing touches.
Flooring
At this point during the renovation I had become very comfortable with all the decision needing to be made within the construction side of things. Now it came down to deciding the finishing touches and that meant I had to be my own interior designer. This was pretty tricky for me as it was tough for me to look at a floor sample and determine how well that would go with the house and especially the kitchen cabinets. Shopping for flooring was interesting though and I quickly learned that asking lots of questions can help you through these tough decision. I had a floor in mind and I brought the samples right to the cabinet maker that was installing my cabinets and asked for his opinion. Whether the floor would clash with the cabinets or whether the color sequence was not just not right. He confirmed that the floor I was holding in my hand, that I had good feelings about, would work great with the kitchen.
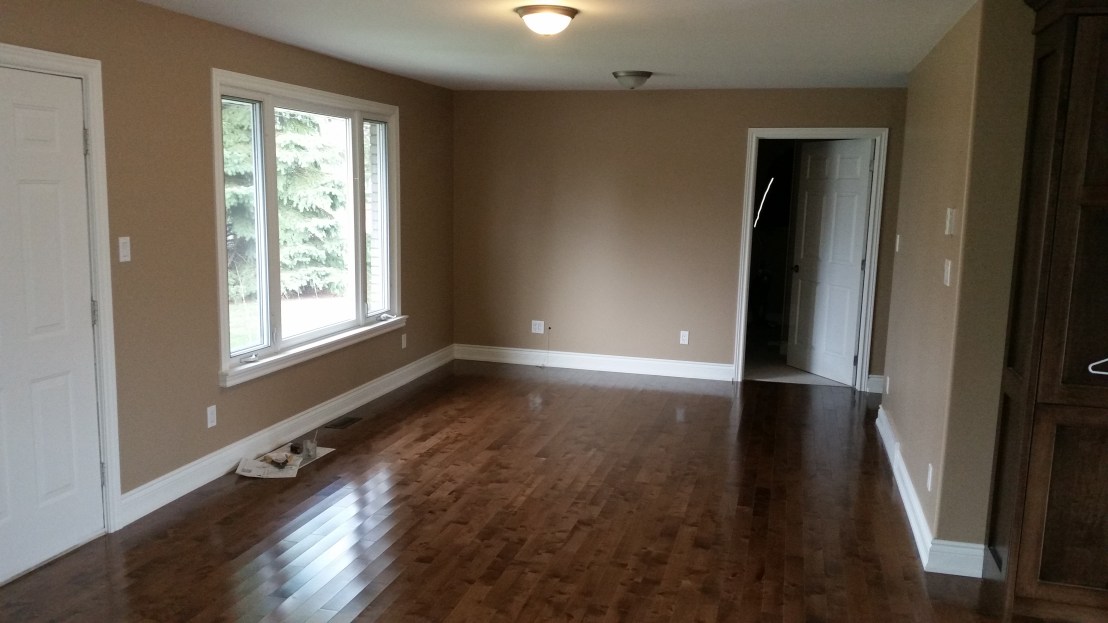
Before I could lay down any flooring I needed to make sure the walls were painted. Again, this required the interior design skills that I didn’t really have. I had originally planned to do the painting myself but after applying the primer I had decided that this task was best left to the professionals as it is something that everyone will be able to see in the end. If I make mistakes or do something wrong it will be extremely visible and I didn’t want that. Also, it didn’t seem feasible for me to do this as the painter had it down within 2 days or so. For the color, I needed something that was in lighter than my floor and my kitchen but not too light. I asked to painter what color he would paint the walls with and I went with his color choice as my final decision. The amount of experience these guys have and the number of houses they have seen gave me a lot of trust in his decision. I was at work when this was being done so when I walked into the house for after he was done I had another big smile on my face. It was starting to all come together. But there was still some work to be done.
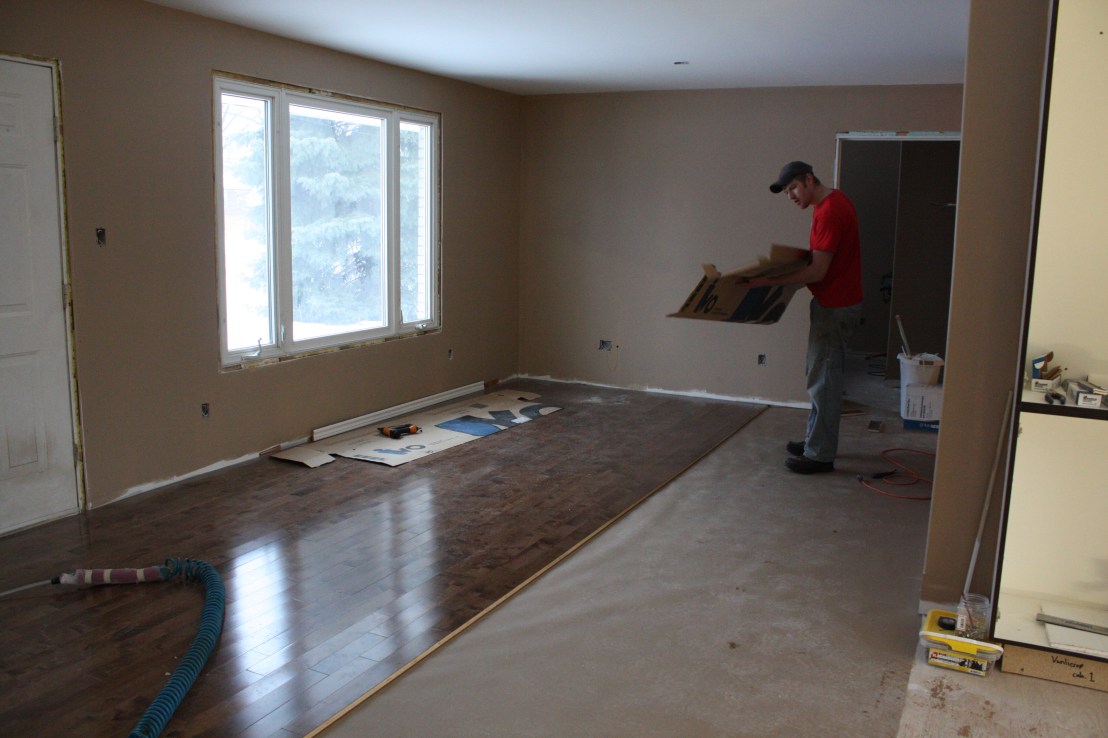
The floor was purchased and brought into one of the bedrooms to better climatize the hardwood to the house. I didn’t have them outside long but really wanted to make sure that there were no issues when it came time to install the floor. About halfway through January I started to lay the flooring in the house. the plan was to do the living room dining room and kitchen all in hardwood. I had some help to get this started from some new friends at the time, they let me borrow a laser level to make sure that the first few rows of the floor were spot on. The laser level allowed us to have a good starting point that was precise and easy to work off. I also borrowed a floor-nailer from the same guy and away I went hammering the pieces in. The process was slow but the result was amazing. The hardwood came in only a handful of different lengths so it was a bit of puzzling for each row to be laid. I wanted to make sure that I never had any 2 rows or even 3 rows where the seams would line up. The way I was told to lay the floor was to start the next row with the cutoff from the previous row. This made sense but I started having more and more difficulty avoiding any seams being too close. I slowly switched the process to a different technique. Starting on each end with a cutoff piece from the last row but then cutting it down to one of the 5 different sizes to start the row. This allowed for minimal waste and it helped lay the floor a bit quicker in the end.
The hardwood was interesting to lay but very repetitive. Lay out a row, nail it in place, repeat. It took quite a few nights for me to finish all 550 square-feet. The bathroom was next and I knew that I wanted tiling in here. To make sure that the floor was solid I laid an additional layer of subfloor in the bathroom as to prevent any cracking in the grout that may occur. This also helped within the doorway as the tile that was purchased would be the exact same height as that of the living room so not to create a small step down. The tiling involved a few nights of watching YouTube videos and learning the tips and trick. Dad as always was also there to offer lots of advice as he had put in some tile in his house not 5 years prior. It starts with making sure everything is laid out just right. The best thing is to avoid any spots where the tile must be cut to a thin strip. In my bathroom, this was going to be the case as I wanted the center open area to have as many full tiles as possible. The way my bathroom is, I was able to hide most of these small pieces under the vanity and behind the toilet. These would be the areas that would be least visible. The open wall on the opposite side would have pieces against the wall that were just over half of a tile. This worked out great and I’m glad that I took the time to plan everything out prior to installation.
The installation of the tiles was quite simple in the end and just involved some sore knees and back. Dad already had a wet-tile saw which made cutting the tiles a breeze. I made sure to cover up any areas that would get dirty from the grout and mortar mix. All the cutting was done in one of the bedrooms as it did not have any flooring in there yet. I laid the tiles in sections, first the middle row that would act as a reference point. Then the left and right side were laid against the middle row. I allowed the middle row to dry before starting on the remainder of the bathroom to make sure it would not move if nudged and I was able to kneel down on these tiles to allow me to reach all corners of the bathroom. The grout was mixed and put in between the tiles followed by a wet sponge to clean up the grout and give it a nice smooth face in between the tile.
This left me with 2 bedrooms with no flooring in them as I decided that I wanted carpet in the bedrooms. I felt that this would be nicer on the feet when getting out of bed in the morning and it helped give the house some separating between living room space and bedroom space. Once all the mess from the tiling was cleaned up I called a carpet place and they installed the carpet within an afternoon. Alas, all the flooring was done and it was really starting to come together.
Trim was really the only “construction” part that was left at this point. Me and dad tackled this in a weekend in March and everything went very smooth. I did all the baseboard while dad did all the door frames and window frames. The windows weren’t recessed in the wall very far so there was not window sill at all. Dad had an idea to make a small window sill underneath each window so to give the rooms a bit more style. This ended up looking great an it was done on all the windows in the living room and kitchen. The bedrooms windows were done normally as they would look good without the sill because of their height off the floor. For the baseboard, 6-inch boards were bought as these would look the best in my opinion. The person that did the taping and mudding for me also gave me a tip to add a little more of a deign to the baseboard by adding a small piece against the 6-inch baseboard that would go tight to the floor. This closed off any small gap that was left between the baseboard and floor. Normally when this is done, people use quarter round, but he told me to use “door-stop” trim pieces which added a far better design to everything.
Kitchen

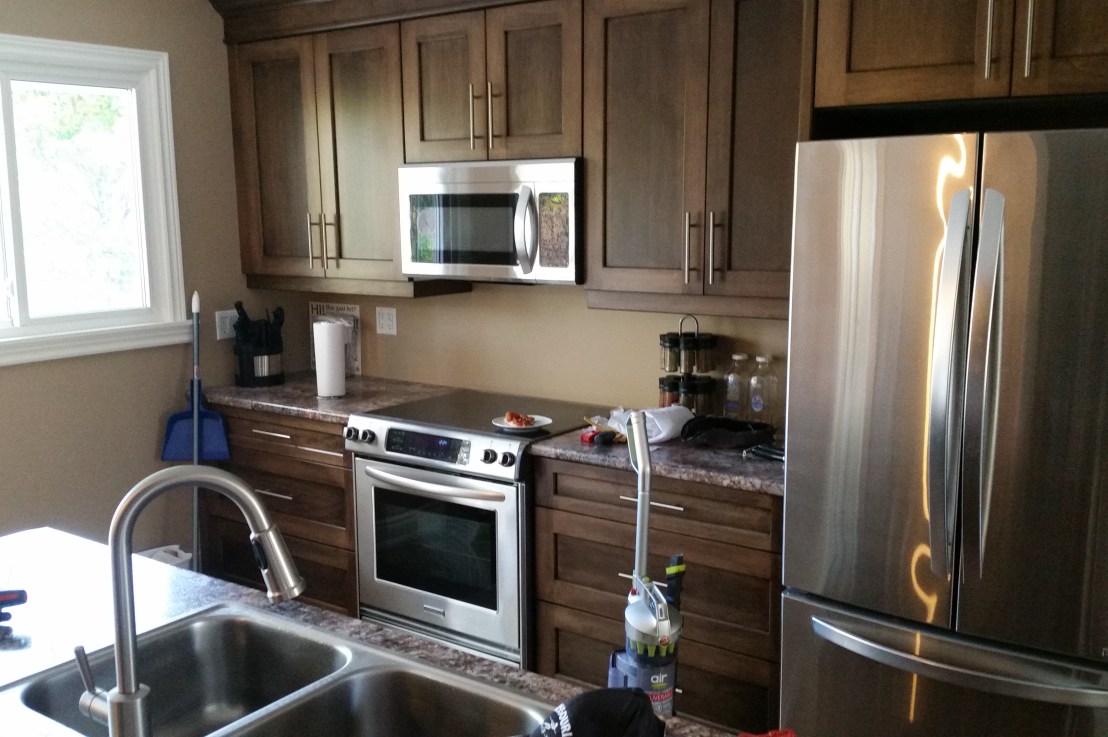
In the kitchen, the cabinet maker was able to fit all the doors in place and put the final trim pieces in place. The island was installed and I was thrilled to see that everything was looking exactly as I had planned. The cabinet doors and drawers were all “soft-close” which was a feature that of course needed to be tested out by everyone. Once the kitchen was done it was time to do some remaining jobs.
Electrical
At this point, everything was done from a “construction” stand point. It was time to finalize the electrical and add some temporary lighting. Yes, I said temporary lighting as I wanted to wait until the very end when the basement was all done so I could do all the lighting at once and follow a similar theme throughout the entire house. the electrical was fairly simple and straight forward. I will admit there were some issues with remembering where the wires went as they were installed such a long time ago already. A quick check with a multi-meter and I was able to locate any wires that I was unsure about. There were a few 3-way switches that were needed and even one 4-way switch. Google can even be confusing about this at times as there are a number of different layouts that can be done to have a operational 3-way switch.
Plumbing

The vanity that was salvaged from the original bathroom was cleaned up and brought back up to the main floor and installed as a temporary nice looking solution to a bathroom sink. The toilet was brought up as well and installed without any issues. I now had a fully functioning bathroom with 100% leak-free plumbing. The kitchen sink was also cut into the island and I added a nice big tap to it that matches all the cabinet handles.
Move in Time
Finally, the day had come. The day when I could take down my bed at my parents’ house, pack up my clothes, and grab anything else that I would need at my “new” house. It has been a while but I believe it was Easter weekend when I started the big move. This was extremely satisfying to a point. Everything went great and I loaded the house with all my stuff only to realize that I had nowhere near enough to fill the entire main floor. For the first 6 months, I didn’t have anything in my living room except for maybe a laundry rack every now and then. Even the kitchen was bare. I would be without any appliances for almost 4 months before purchasing a full set. I was living off the BBQ for food and had an old fridge, that I had bought from a friend, in the garage to store food. The cabinets were almost all empty, this was OK as it wasn’t noticeable until someone opened the cabinet.
Relaxing
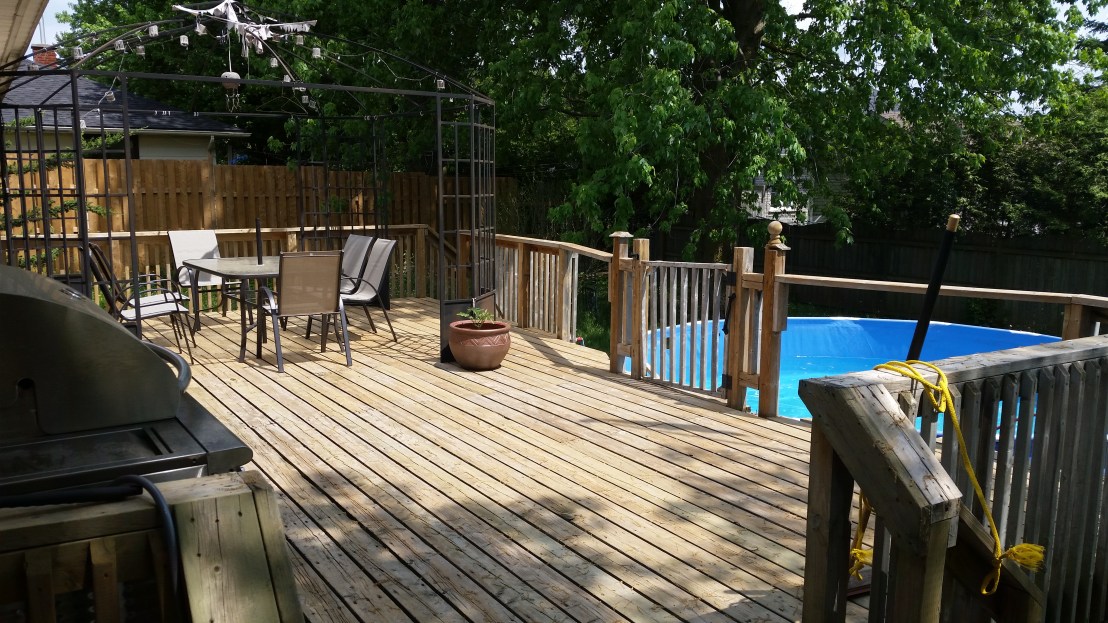
It was time to relax and enjoy the summer. I had worked very hard for over a year both on my house and also at work. I decided that for the summer I would spend some more time with friends and get caught up on everything again before diving back into renovations in the basement. I had bought a used pool for a great price in 2013 but never had the chance to set it up. This I thought would make a great addition to my house. The house had originally come with a pool but it must have gotten destroyed by the weather during the time the house sat for sale on the market. The pool I had was a bit smaller but that was alright. I was able to do some leveling of the ground where the pool had originally sat and I was ready to get it set up. This was one of my favorite things to enjoy the entire summer. I would get done work, put on my swimming shorts and relax in the pool.
Back to Work

The pool was great for the summer but I realized quite quickly that the yard didn’t have as much privacy as I wanted. The chain-link fence was nice to separate the yards but it didn’t do me much good for privacy, not to mention it was a bit of an eyesore as well. I had a chat with both neighbors and asked them how they felt about having a new fence in between the properties. Both sides were on-board and I quickly jumped into another project. The chain-link fence came out very quick, especially with the help of some big toys. I was able to borrow a large skid-steer for a week or so from a good friend of mine. This helped pull the old post out of the ground really quick and without any effort. The posts came out with concrete and all.
I wanted to make sure this fence was done right so I made sure I called to have the locates done. This is a free marking of all lines that could run through the yard including gas, hydro, phone/cable, water and sewer. This was very important as the cost of hitting a line would be far too expensive for my budget. I knew before I started any digging that there wouldn’t be anything in the backyard but seeing as it was free it didn’t hurt to double check. After everything was laid out and marked, I rented a post-hole auger and bit and dad and I went to work on digging the holes. When I say “we went to work”, I actually meant that I held a button while the machine dug the holes without any problems.
Setting the post square and plumb was important so lots of bracing was used in the initial setup. A stone was placed at the bottom off each hole to allow any buildup of water to drain away from the bottom of the post after the concrete was poured. A concrete mixer was rented for a day and within 2 to 3 hours we had all 14 posts poured. The total lineal feet of fence I was putting up was just over 100-feet so this meant I would need a lot of fence-boards. With a simple jig to line all the boards up it was very simple to install the entire fence. the only issue that remained now was the big slope in between the neighbor’s property and mine. Luckily, I was able to get a load of topsoil delivered for a low price and I used the skid-steer to bring 20-cubic yards of top-soil around to the backyard. Leveling went really easy and the yard was all of a sudden, a lot better looking. I made sure to keep a slope towards the back fence as to not have water running towards the house.
Last few Purchases


2015 had one more big expense left and that was the purchase of some appliances. After lots of shopping and price matching I found exactly what I was looking for. I got a decent deal on a whole package that included stove, fridge, dishwasher, over-the-range-microwave, washer and dryer. For the kitchen, I made sure to get everything stainless steel to match the cabinet handles and because I really liked the look of it. For the washer and dryer however I wasn’t too concerned. Even when the basement was going to be finished I still didn’t think that the laundry room needed a fancy washer and dryer. Before the middle of December, I also bought some living room furniture. 2 couches that would fit in nicely with the color scheme that I had going.
Planning for next “Big” project
Nearing the end of 2015 left me wondering how I should tackle the basement. There were multiple thought including having 2 bedrooms in the basement and a full bathroom, and having only 1 bedroom with an on-suite bathroom that can also be accessible from the rest of the basement. I decided to go with the latter of the 2 as I wanted to make sure that there was a large bedroom down here without losing too much of the rec room that I wanted to have. This even allowed for a decent size office space that if needed could be used as a temporary bedroom for guests. I started by cleaning the entire basement and moving anything that would be in the way to the garage.
2016 would be the year I tackle the basement so I left the year at that. I had once again accomplished a lot in the 2015 year that I hadn’t even planned for. The fence was an unplanned project as was the leveling of the backyard.
In summary, I want to apologize for lying at the beginning of this post. I only now realized that this post is just as long as the last. It turns out that this year was just as busy, smaller projects but more of them.
Feel free to like or share the post and leave a comment or question down below. I look forward to hearing from everyone about the posts or the blog itself.
Thank you and stay tuned for the 2016 Recap.
